What is curl?
curl is really just a tool for transferring data using URLs. Since a REST API call is URL based, you can use curl to make API calls to your network devices.
How to Install curl
I deployed a CentOS VM from an ISO and curl was preinstalled on that image. However, if you don’t have curl pre-installed, or need to update it to a more recent version, you can use the package management tool of choice for your Linux OS. In my case, I will update my curl version using yum. To install, simply run the command below:
|
1 |
[root@localhost ~]# yum install curl |
|
1 |
[root@localhost ~]# yum update curl |
Making your first API call
I’ll walk through the same example of creating a new NSX logical switch that I used in my Getting Started with Postman post. In this case I will need to make 2 separate API calls. The first will get the scope ID of my NSX transport zone. The second will use the scope ID to create the logical switch. Using the NSX API guide as reference for the URL format.
|
1 2 3 4 5 6 7 8 9 10 11 12 13 14 15 16 |
[root@localhost ~]# curl -u admin https://usq1-0-nsx1.oc.vmware.com/api/2.0/vdn/scopes Enter host password for user 'admin': curl: (60) Issuer certificate is invalid. More details here: http://curl.haxx.se/docs/sslcerts.html curl performs SSL certificate verification by default, using a "bundle" of Certificate Authority (CA) public keys (CA certs). If the default bundle file isn't adequate, you can specify an alternate file using the --cacert option. If this HTTPS server uses a certificate signed by a CA represented in the bundle, the certificate verification probably failed due to a problem with the certificate (it might be expired, or the name might not match the domain name in the URL). If you'd like to turn off curl's verification of the certificate, use the -k (or --insecure) option. [root@localhost ~]# |
In the output above you can see I got a certificate error, since I have not imported the self-signed certificate I am using on this NSX manager. For now I’ll work around that by choosing to ignore certificate errors for this call. Of course, ignoring the certificate defeats the purpose of having the certificate to begin with, so use this sparingly. I add the -k option below to ignore the certificate:
|
1 2 3 4 |
[root@localhost ~]# curl -k -u admin https://usq1-0-nsx1.oc.vmware.com/api/2.0/vdn/scopes Enter host password for user 'admin': <?xml version="1.0" encoding="UTF-8"?> <vdnScopes><vdnScope><objectId>vdnscope-1</objectId><objectTypeName>VdnScope</objectTypeName><vsmUuid>422C4151-498F-2B64-9DFD-D88EAF4B42B2</vsmUuid><nodeId>7557280e-37dc-4a8f-abd9-b64a841f5ce6</nodeId><revision>1</revision><type><typeName>VdnScope</typeName></type><name>usq1vcore0vc1</name><description></description><clientHandle></clientHandle><extendedAttributes/><isUniversal>false</isUniversal><universalRevision>0</universalRevision><id>vdnscope-1</id><clusters><cluster><cluster><objectId>domain-c1380</objectId><objectTypeName>ClusterComputeResource</objectTypeName><vsmUuid>422C4151-498F-2B64-9DFD-D88EAF4B42B2</vsmUuid><nodeId>7557280e-37dc-4a8f-abd9-b64a841f5ce6</nodeId><revision>41</revision><type><typeName>ClusterComputeResource</typeName></type><name>usq1vcore0vc1c2</name><scope><id>datacenter-2</id><objectTypeName>Datacenter</objectTypeName><name>usq1vcore0vc1</name></scope><clientHandle></clientHandle><extendedAttributes/><isUniversal>false</isUniversal><universalRevision>0</universalRevision></cluster></cluster><cluster><cluster><objectId>domain-c17</objectId><objectTypeName>ClusterComputeResource</objectTypeName><vsmUuid>422C4151-498F-2B64-9DFD-D88EAF4B42B2</vsmUuid><nodeId>7557280e-37dc-4a8f-abd9-b64a841f5ce6</nodeId><revision>73</revision><type><typeName>ClusterComputeResource</typeName></type><name>usq1vcore0vc1c1</name><scope><id>datacenter-2</id><objectTypeName>Datacenter</objectTypeName><name>usq1vcore0vc1</name></scope><clientHandle></clientHandle><extendedAttributes/><isUniversal>false</isUniversal><universalRevision>0</universalRevision></cluster></cluster></clusters><virtualWireCount>21</virtualWireCount><controlPlaneMode>MULTICAST_MODE</controlPlaneMode></vdnScope></vdnScopes>[root@localhost ~]# |
You can see the command format above returns the XML reply on a single line, which makes it very difficult for a person to read. I can clean up the XML by piping it through xmllint. If xmllint isn’t already installed, you can get it by installing the libxml2 package using your package manager (like yum install libxml2).
|
1 2 3 4 5 6 7 8 9 10 11 12 13 14 15 16 17 18 19 20 21 22 23 24 25 26 27 28 29 30 31 32 33 34 35 36 37 38 39 40 41 42 43 44 45 46 47 48 49 50 51 52 53 54 55 56 57 58 59 60 61 62 63 64 65 66 67 68 69 70 71 72 73 74 |
[root@localhost ~]# curl -k -u admin https://usq1-0-nsx1.oc.vmware.com/api/2.0/vdn/scopes | xmllint --format - Enter host password for user 'admin': % Total % Received % Xferd Average Speed Time Time Time Current Dload Upload Total Spent Left Speed 100 1766 0 1766 0 0 3576 0 --:--:-- --:--:-- --:--:-- 3574 <?xml version="1.0" encoding="UTF-8"?> <vdnScopes> <vdnScope> <objectId>vdnscope-1</objectId> <objectTypeName>VdnScope</objectTypeName> <vsmUuid>422C4151-498F-2B64-9DFD-D88EAF4B42B2</vsmUuid> <nodeId>7557280e-37dc-4a8f-abd9-b64a841f5ce6</nodeId> <revision>1</revision> <type> <typeName>VdnScope</typeName> </type> <name>usq1vcore0vc1</name> <description/> <clientHandle/> <extendedAttributes/> <isUniversal>false</isUniversal> <universalRevision>0</universalRevision> <id>vdnscope-1</id> <clusters> <cluster> <cluster> <objectId>domain-c1380</objectId> <objectTypeName>ClusterComputeResource</objectTypeName> <vsmUuid>422C4151-498F-2B64-9DFD-D88EAF4B42B2</vsmUuid> <nodeId>7557280e-37dc-4a8f-abd9-b64a841f5ce6</nodeId> <revision>41</revision> <type> <typeName>ClusterComputeResource</typeName> </type> <name>usq1vcore0vc1c2</name> <scope> <id>datacenter-2</id> <objectTypeName>Datacenter</objectTypeName> <name>usq1vcore0vc1</name> </scope> <clientHandle/> <extendedAttributes/> <isUniversal>false</isUniversal> <universalRevision>0</universalRevision> </cluster> </cluster> <cluster> <cluster> <objectId>domain-c17</objectId> <objectTypeName>ClusterComputeResource</objectTypeName> <vsmUuid>422C4151-498F-2B64-9DFD-D88EAF4B42B2</vsmUuid> <nodeId>7557280e-37dc-4a8f-abd9-b64a841f5ce6</nodeId> <revision>75</revision> <type> <typeName>ClusterComputeResource</typeName> </type> <name>usq1vcore0vc1c1</name> <scope> <id>datacenter-2</id> <objectTypeName>Datacenter</objectTypeName> <name>usq1vcore0vc1</name> </scope> <clientHandle/> <extendedAttributes/> <isUniversal>false</isUniversal> <universalRevision>0</universalRevision> </cluster> </cluster> </clusters> <virtualWireCount>21</virtualWireCount> <controlPlaneMode>MULTICAST_MODE</controlPlaneMode> </vdnScope> </vdnScopes> [root@localhost ~]# |
From the highlighted line above I can see the object ID of my transport zone is “vdnscope-1”. Knowing this information, I will now be able to craft my second API call to actually create the logical switch.
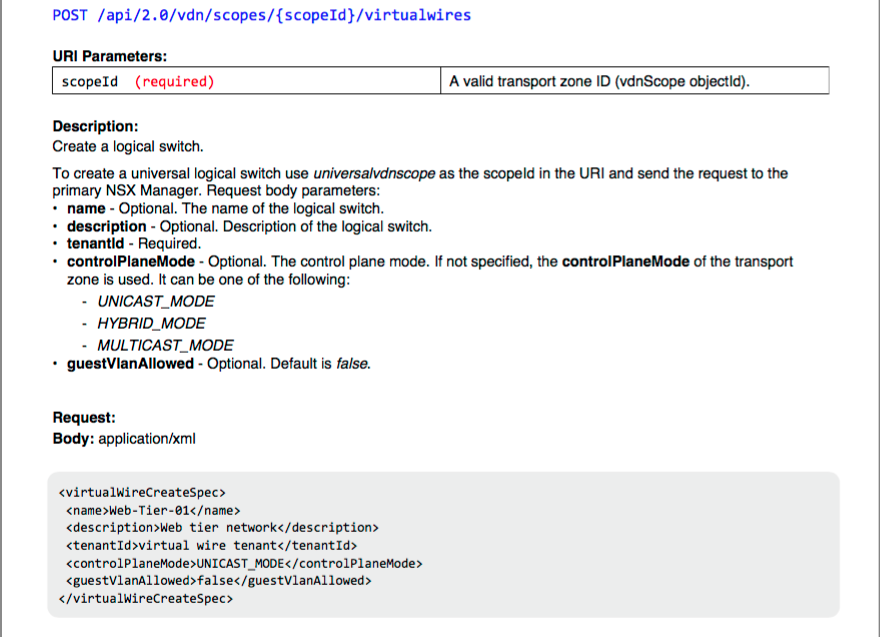
Creating the Logical Switch using POST Method
By referencing the NSX API Guide I can see that I need to use the following format for my URL in order to create a new logical switch:
I will need to do 2 things differently from my previous call:
- Include a body with my request.
- Change the request method to POST.
- Include the Content Type header of “application/xml”
In order to include a body, I will create an XML file called “ls_create.xml” following the format above, but containing my configuration data:
|
1 2 3 4 5 6 7 |
<virtualWireCreateSpec> <name>test-ls</name> <description>Test Logical Switch</description> <tenantId>Tenant1</tenantId> <controlPlaneMode>MULTICAST_MODE</controlPlaneMode> <guestVlanAllowed>false</guestVlanAllowed> </virtualWireCreateSpec> |
Based on the 3 items above, here is the command format I end up with. You can see the data file is preceded by the “@” symbol. The response from the NSX manager is simply the object ID of the newly created logical switch – in this case, “virtualwire-27”.
|
1 2 3 4 |
[root@localhost ~]# curl -k -u admin -X POST -H "Content-Type: application/xml" -d @ls_create.xml https://usq1-0-nsx1.oc.vmware.com/api/2.0/vdn/scopes/vdnscope-1/virtualwires Enter host password for user 'admin': virtualwire-27 [root@localhost ~]# |
And verifying on the NSX manager, we can see our new logical switch created using curl commands:
